
Contents


You’re making sales on Etsy, but when you check your bank account, the deposits don’t match. Where did the money go?
Etsy deducts fees, refunds, and taxes before it even hits your account, which makes tracking your actual revenue tricky. And if you’re manually sorting through every transaction, you’re not just losing money but also time. (up to 25 hours per week, to be exact)
Instead of playing detective with your finances, let’s talk about accounting automation software so you can focus on growing your business.
Can you link Etsy with QuickBooks?
Yes! QuickBooks can integrate with Etsy to simplify accounting, but not all solutions are equal.
There are two ways to sync Etsy with QuickBooks:
- Etsy’s QuickBooks connector offers a basic integration that imports sales, fees, and expenses and matches deposits to bank transactions but has limitations like minimal automation, inaccurate VAT and tax breakdowns, no multi-channel support, and a lack of transaction summaries.
- Tools like Webgility, on the other hand, offer comprehensive automation to sync sales, categorize Etsy fees, and reconcile payouts, giving you accurate financial records with zero manual work.
Methods to Enter Etsy Sales into QuickBooks
If you prefer not to integrate directly, you can still manage your Etsy bookkeeping in two ways: manually or through automation.
- Manually enter sales from Etsy reports (Best for small sellers preferring a cost-effective approach)
If you're a small seller processing fewer than 100 orders per month and prefer a cost-effective approach, you can manually enter your Etsy sales into QuickBooks.
How to manually record Etsy sales into QuickBooks
Since Etsy deducts fees, refunds, and taxes before depositing payouts, tracking the full picture of your revenue requires extra effort. Here’s how you can do it step by step:
1. Download Etsy sales reports
Before recording the sales data, you need to download all transaction data from Etsy.
- Log in to the Etsy Seller Dashboard
- Go to Settings > Finances > Payment Account
- Click Download CSV
- Select the date range you need and export the file
*The report includes sales, fees, refunds, and Etsy VAT.
2. Find Etsy payouts in QuickBooks
Locate the deposit in the banking section.
- Open QuickBooks Online
- Go to Transactions > Banking
- Click Upload Transactions
- Select your Etsy CSV file and map the categories
3. Create a sales receipt or journal entry
You’ll need to create either a sales receipt or a journal entry to accurately log Etsy revenue.
The sales receipt method is best if you track sales individually.
- Go to + New > Sales receipt
- Select your Etsy customer (or create a generic one)
- Enter sales amount, fees, and taxes
- Save and close
The journal entry method is best for summarizing transactions.
- Go to + New > Journal entry
- Debit sales income for the total revenue
- Debit Etsy fees for deductions
- Credit Etsy deposits for the final payout amount
- Save and close
4. Review & reconcile
- Go to Transactions > Banking
- Select your Etsy deposit
- Match it to recorded sales, minus fees
- Confirm the match and save
Is going the manual way truly worth it?
Here’s when manual Etsy bookkeeping hurts your business
Manually entering Etsy sales might work if you only process a handful of orders, but it comes with risks:
- Mismatch between 1099-K and QuickBooks records: Etsy’s 1099-K reports gross sales, including fees, refunds, and taxes, while many sellers manually record only net deposits. This discrepancy can lead to inaccurate tax reporting and potential IRS audits.
- Sales tax confusion: If Etsy collects and remits sales tax on behalf of sellers, but it's not properly categorized in QuickBooks, it can result in sellers mistakenly over-reporting taxable income. Check out this guide on eCommerce tax filing to avoid costly mistakes.
- Unaccounted fee deductions: Etsy deducts fees before payouts, and if sellers don’t manually break these down in QuickBooks, they might miss deductible expenses, leading to overpaying taxes.
Automate Etsy-QuickBooks integration with Webgility
The best way to streamline Etsy bookkeeping for mid-high volume sellers is by integrating Etsy with QuickBooks using Webgility.
Unlike basic Etsy-QuickBooks integrations, Webgility does all the heavy lifting:
- Automatically import Etsy sales, refunds, and fees into QuickBooks
- Categorizes expenses like transaction fees, shipping costs, and taxes
- Matches Etsy payouts to your bank deposits for effortless reconciliation
Setting it up is easy. Here’s how:
Begin by signing up for Webgility Etsy integration. Head to the Webgility website and click “Try for free” in the top right corner to get started.
|
📌Note: Depending on your QuickBooks version, choose the right Webgility platform:
|
Connect your Etsy store with Webgility
Once you've signed up, the next step is linking your Etsy store to Webgility so it can start syncing your sales data.
- Go to the Connections section and click on the ‘+’ symbol located beside the Sales Channel option

📌Note: If this is the first sales channel you’re setting up, read the process here. - Select Etsy and proceed by clicking the Next option

3. In the "Enter Details" tab, choose the time zone for importing orders and then proceed by selecting the "Next" option.
4. In the "Authorize Sync" tab, click Next to log in to Etsy and authorize Webgility to sync orders and products

5. An Etsy pop-up will appear; select all options from the left panel, starting with Enter Sales Channel details.

📌Note: Ensure all pop-ups are enabled.
6. After signing in, Webgility Online will connect to your Etsy store, and click Finish to complete the setup.

7. Finally, you will receive a notification confirming the integration of Etsy with Webgility Online

8. After completing the connection process, you will be redirected to the Connection screen and the Etsy Sales Channel profile will be displayed

Similarly, follow these steps to connect your Etsy store with Webgility desktop.
- Open Webgility Desktop and navigate to Integrations > Stores > Add Store
- Select Etsy as your sales channel and click Next
- Enter your Etsy store name and click Connect to Etsy
- Log in to your Etsy account and authorize Webgility
- Choose the Etsy shop you want to connect to and click Allow Access
- Webgility will sync with Etsy, click Next to continue the setup
- Configure order download settings and map accounts as needed
- Click Finish to complete the integration
Watch this video tutorial for step-by-step guidance.
Connect QuickBooks to Webgility
Once your Etsy store is connected, the next step is linking QuickBooks to Webgility for accurate accounting.
Steps to connect Webgility Online with QuickBooks Enterprise, Pro, or Premier:
1. Log in to Webgility Online and go to Connections

2. Select QuickBooks Online and click Connect

3. On the next pop-up window, it will ask you to Authorize Webgility, click Next, and log in to QuickBooks Online.\

Once logged in, Webgility Online will download the items, customers, and other information. Once successfully connected you will be directed to the connections screen.
Then, go to Sync Settings and choose Etsy as the source and QuickBooks as the destination for data flow.
Similarly, follow these steps to connect Webgility desktop to QuickBooks Enterprise.
- Once your sales channel is connected, navigate to Integrations >> Accounting/POS/ERP >> Add Connection and select the version of QuickBooks that you are using from the drop-down menu.
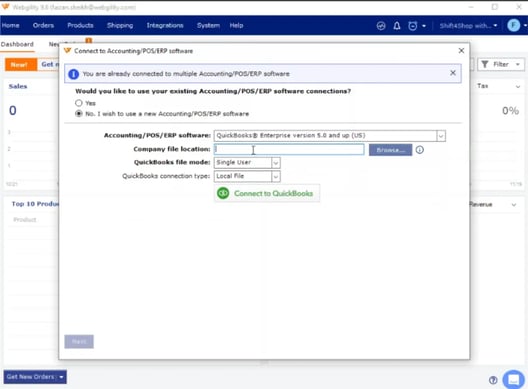
- Launch the QuickBooks company file that you want to connect to Webgility
- Click Connect to QuickBooks, then open QuickBooks as Admin in single-user mode.
- Grant Webgility access by selecting Yes, Always Allow in QuickBooks. Press the F2 or Control + 1 key to bring up the Product Information window on the screen.

- Copy the company file location from the Product Information window, then close it.
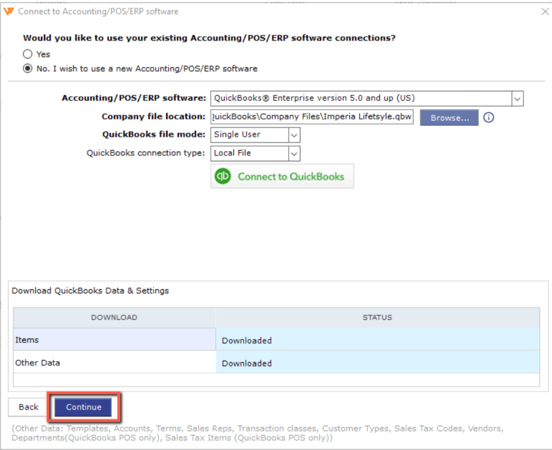
- Paste the copied file path to the Company file location field in the Webgility connection window. Then click Connect to QuickBooks.

- This will open the Application Certificate in QuickBooks and grant access to the Webgility application from QuickBooks.

- Once this permission is granted, click Continue to process
For thorough, step-by-step guidance, watch this video tutorial or follow the steps in the interactive demo to get started.
Import Etsy sales data to QuickBooks
Once you connect your Etsy shop and QuickBooks with Webgility, you can choose between real-time syncing (updates every 1-2 hours) or daily batch imports. Webgility then captures orders, refunds, and Etsy fees automatically so there’s no need for manual data entry.
This way, Webgility simplifies how to record Etsy sales in QuickBooks Desktop or Online.
Configure sales mapping & expense categorization
Webgility automatically maps Etsy sales, refunds, and collected taxes to the correct QuickBooks accounts. Whether Etsy has deducted taxes before the payout or you need to account for a refund, everything is categorized correctly so that your books are always accurate and tax-ready.
It also automatically downloads transactions and fees to QuickBooks as summarized journal entries or detailed transactions in real-time, eliminating manual data entry.
Sync transactions & reconcile payouts
Etsy deducts listing fees, transaction fees, and payment processing fees before sending payouts. Webgility captures these expenses and logs them in QuickBooks under the right categories so you get a true picture of your actual profits without manually breaking down every fee.
Reconcile Etsy payouts with QuickBooks
Webgility matches Etsy deposits to corresponding bank transactions in QuickBooks, ensuring your financial records align perfectly. You don’t need to track down missing amounts or manually adjust figures.
If you’re not ready for full automation, the manual method works.
Webgility: The smarter choice for scaling Etsy sellers
The Nappy Shoppe, a Texas-based baby apparel retailer, was drowning in manual order processing across Etsy, Shopify, and Amazon.
- 8+ hours daily wasted on data entry
- Delayed shipments due to bookkeeping errors
- Missed tax deductions from untracked Etsy fees
By integrating Webgility, the best Etsy accounting software, they automated sales imports, order fulfillment, and QuickBooks synchronization across all channels. Order processing time dropped to just 1-2 hours daily, and bookkeeping errors were eliminated as transactions were categorized in real-time.
With 52 hours saved per week, they could focus on growing their business instead of chasing numbers. With the right tools, you can simplify your accounting, eliminate errors, and free up time to focus on growing your business.
Ready to stop wrestling with spreadsheets and spend 25 hours a week on bookkeeping? Get started for free with Webgiity today!
Frequently Asked Questions
What about Etsy’s official QuickBooks connector?
Etsy does offer a direct integration with QuickBooks Online, but it has limitations like fewer customization options and a lack of multi-channel syncing. If you're only selling on Etsy and need basic transaction imports, it might work. But for sellers managing multiple sales channels or needing in-depth financial tracking, Webgility provides more automation, better accuracy, and full control over sales mapping.Does Etsy Automatically Sync Sales with QuickBooks?
No, Etsy does not automatically sync sales with QuickBooks on its own. You'll need to use a third-party integration like Webgility or Etsy’s QuickBooks Connector to import sales, categorize fees, and reconcile payouts.


